Archive | April, 2012

I’m Feeling… Cheesy!!

30 Apr

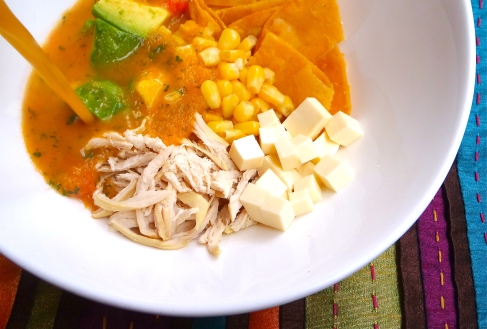
Not THAT kind of cheesy though!! I just have been obsessing over cheese lately… I never knew how great grilled cheese and tomato soup were until I moved here almost three years ago. Back home, in Venezuela, we eat our tomato soup -most of our soups actually- with diced queso blanco. Yummy queso blanco that becomes chewy with the heat of the soup. The queso blanco here is very different than the one back home, I buy mine on Spanish grocery stores but it is usually bland and harder than the one back home. After all this time away though I do enjoy the queso blanco that I find here, but it is never the same. The cheese here is so different than the ones back home because of the milk, most of the white soft cheeses are made with raw milk, which is not allowed here. The pasteurization of the milk makes the flavor and the consistency to change in the cheese making process.

There are many Venezuelan foods that I do not eat here because the ingredients are so different that the end product is too different. Tomato soup was one of those foods; I cannot eat my soup without cheese, and dice of any other cheese changed the flavor too much. But when I tasted the tomato soup with a grilled cheese sandwich I regained my love for tomato soup.

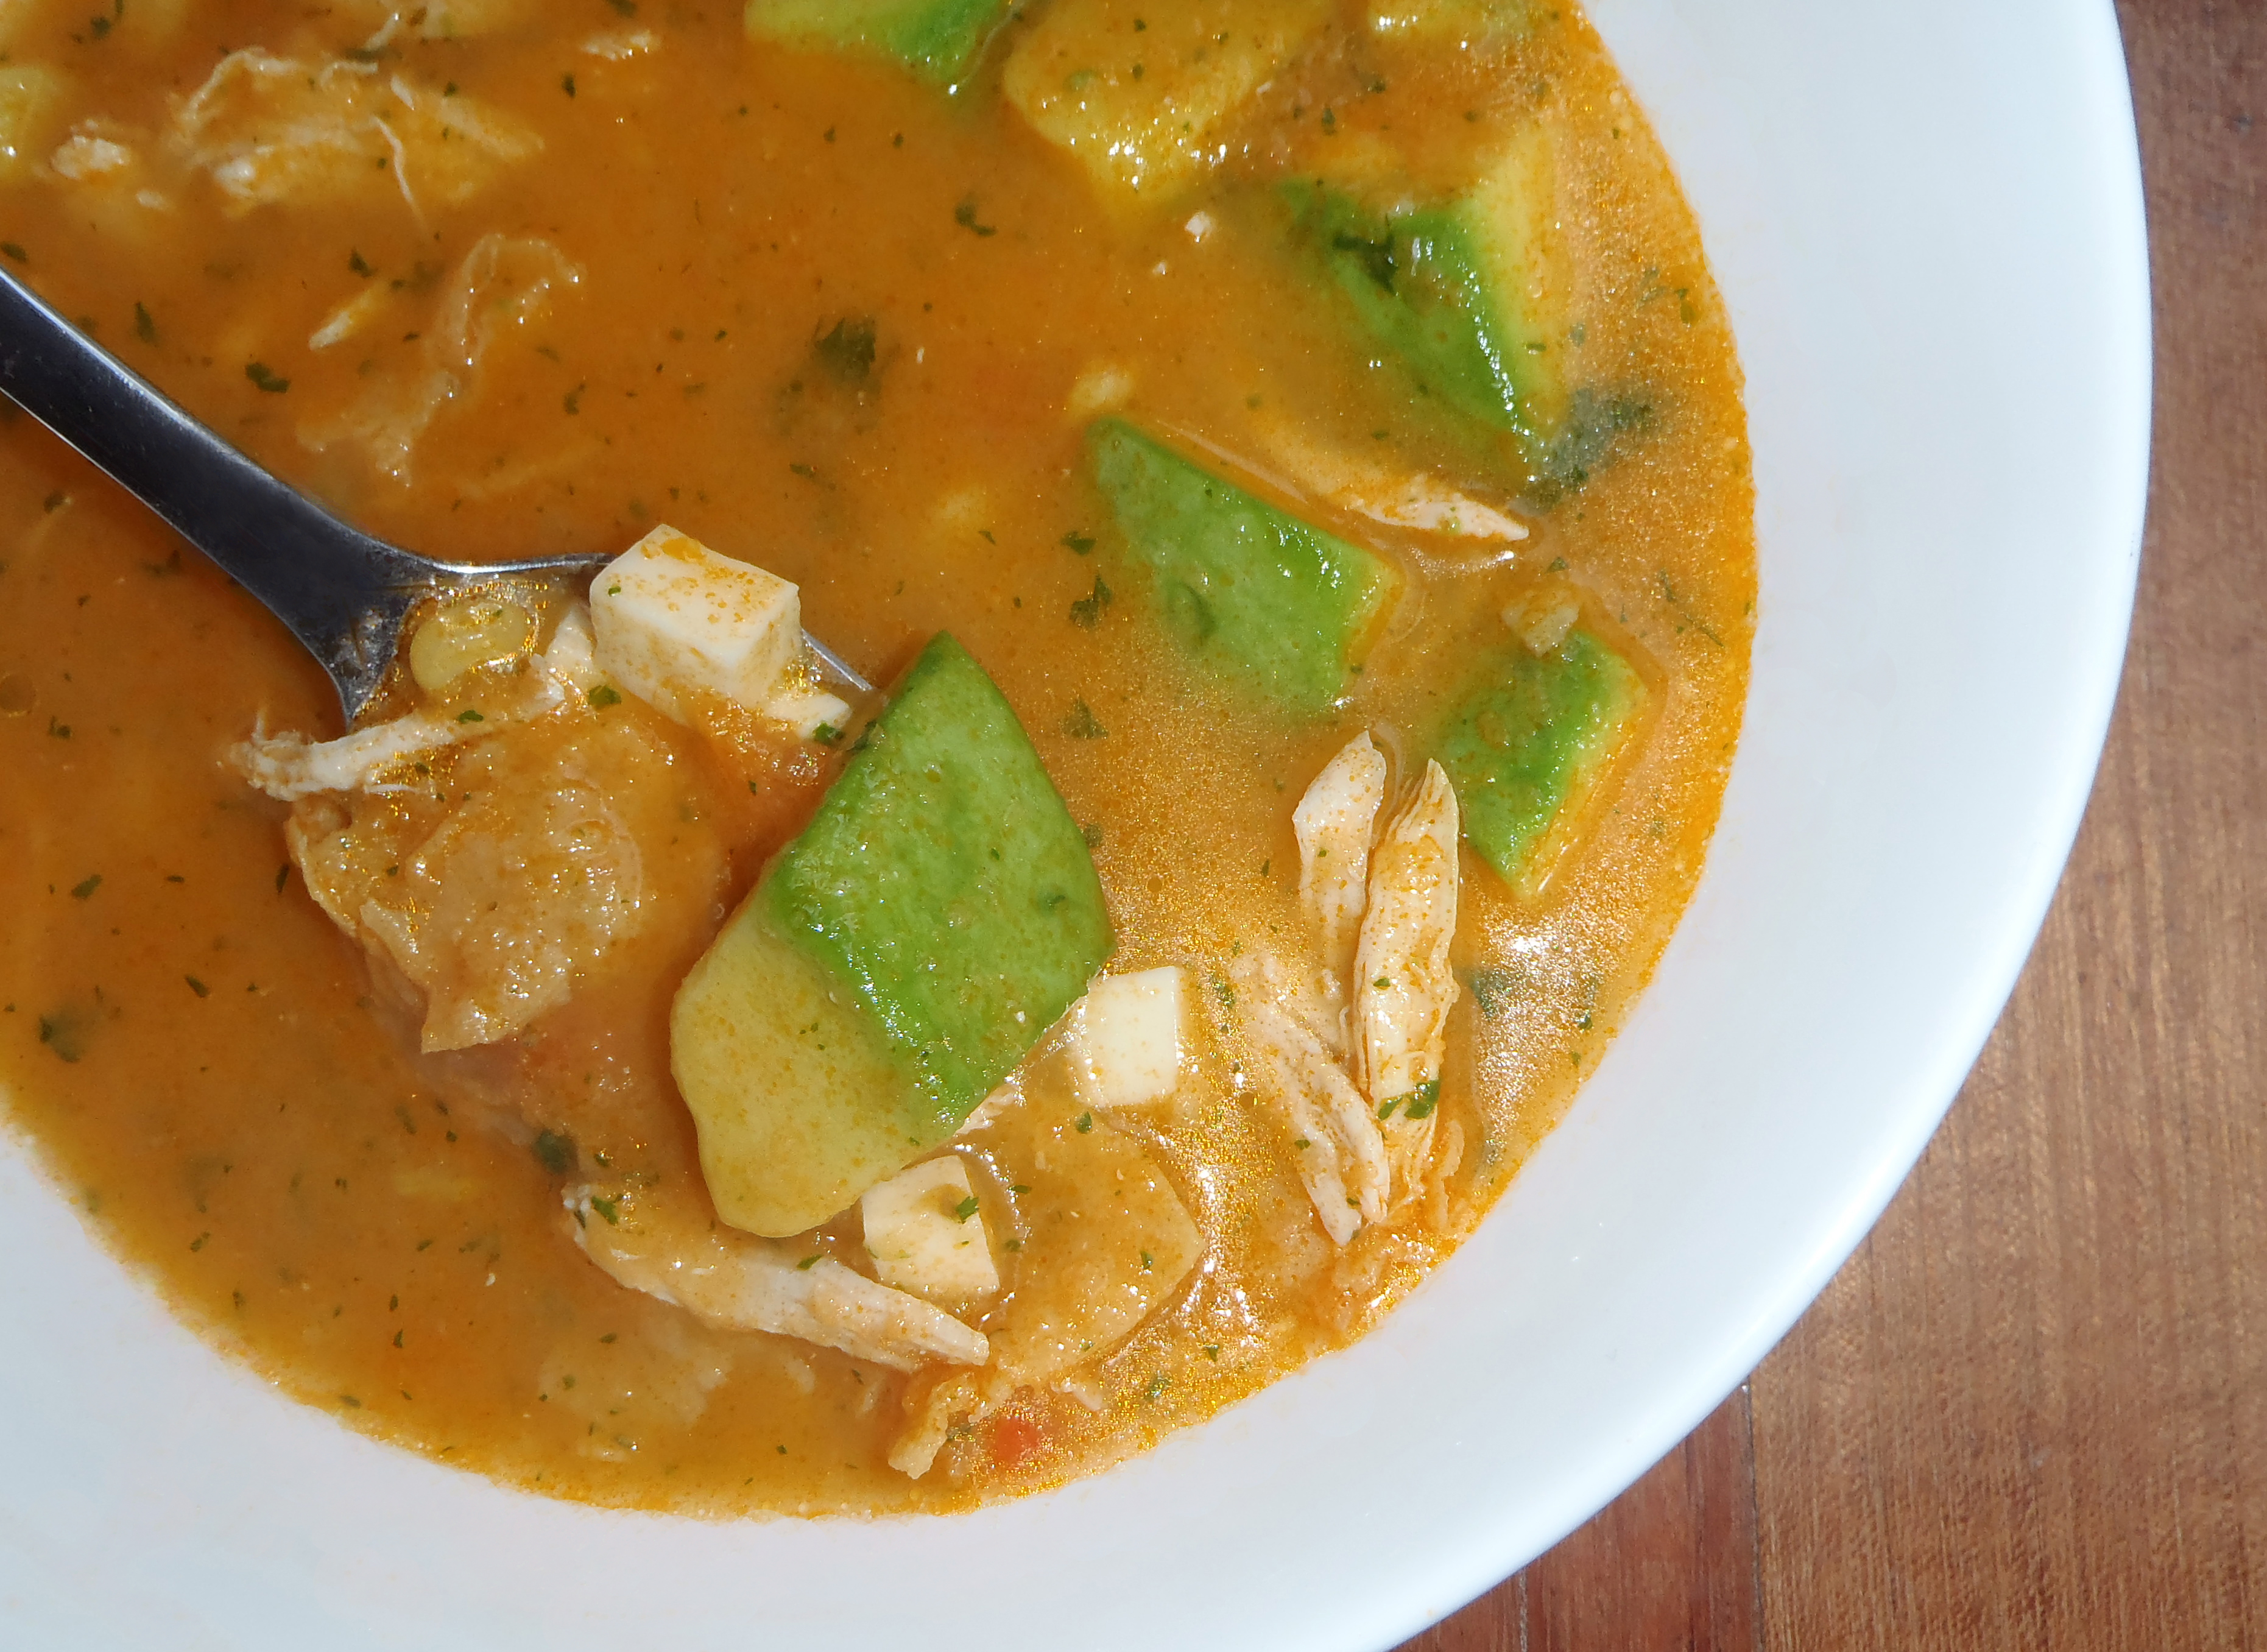
So the other day I went to the farmers market, and I bought 2 lb of tomatoes which is a ton to me since I only cook for two most of the time. I decided to make tomato soup -the one from back home- with grilled cheese but with a twist. Since I’m used to the dice of cheese inside the soup I made grilled cheese croutons and put them inside the food, for the similar experience of stumbling upon pieces of grilled cheese.

EASY TOMATO SOUP WITH GRILLED CHEESE CROUTONS

  • 8 tomatoes, peeled
  • 1 tablespoon butter
  • 1/2 cup yellow onion
  • 1 garlic clove chopped
  • 3 fresh basil leaves, minced
  • 1 teaspoon tomato paste
  • 1 – 2 teaspoon sugar
  • 1/2 teaspoon cornstarch
  • 1/3 cup water
  • 1 cup chicken broth
  • 1/4 cup heavy cream (I used half-and-half)
  • salt

Heat a large pot and melt the butter. Add the onions and the garlicand sauté until soft and translucent. Add the crushed and peeled tomatoes, the basil leaves, and the tomato paste. Cover and cook at low heat for 15 minutes. Add the cornstarch dissolved on the water and cook for 5 more minutes stirring frequently. Slowly, add the chicken broth and let it simmer for 20 minutes. Finally, puree the soup with an immersion blender or a regular blender and pour the cream.

For the grilled cheese croutons make a regular grilled cheese sandwich and cut into small squares with a cookie cutter or a knife.

Enjoy!

Diana.

I’m Feeling… Nerdy!!

27 Apr

Everybody knows that I love making cupcakes. The first time that I made a batch was not so long ago, maybe two years or so. I bought this really cute beginners kit that included a decorators bag, liners, and some tips. I made chocolate cupcakes with strawberry marmalade frosting. Needless to say they came out looking horrendous; the cake didn’t rise up, and I never really mastered the frosting until somewhere around my 100th cupcake. Despite my repeated early failures I eventually came around and now their turn out pretty cute.

I love making cupcakes because they smell delicious when they are baking, they are the cutest dessert ever, and they are so versatile that you can put almost anything you have around in your kitchen and make it work. Of course I wouldn’t put a piece of meat on a cupcake, but you know what I mean. What might come as a surprise though is that cupcakes are absolutely not my favorite dessert to eat… they are a little too sweet for me. Don’t get me wrong, I KNOW they are delicious, but I can’t handle the taste of buttercream frosting, it’s just too much sugar for me at once. Thats why I always use cream cheese frosting; it’s not that sweet, and it let all the other flavors you add shine.

Anyways, the other day I was sitting in this super long class, and I was really hungry and craving something sweet and yummy. So when the class was finally over I stopped by the grocery store and although I rather buy chocolate than candy, the big box of rainbow Nerds candy was on sale, so I bought it… and chocolate. And I kept wondering all the way home how good would the Nerds taste on a cupcake, since they are kind of sour I thought they would blend nicely with the sweetness of the cake. I also had in mind that raspberry frosting would go good with the nerds, and it actually did, so here’s the recipe!

NERDS CUPCAKES WITH RASPBERRY FROSTING

For the Cupcakes (this is the recipe that I always use, it yields 12 cupcakes and it can be doubled easily) 

  • 1/2 cup butter at room temp
  • 1/2 cup sugar
  • 2 eggs at room temp
  • 1 cup cake flour (1 cup AP flour minus 2 tablespoons, plus two tablespoons cornstarch)
  • 1 teaspoon baking powder
  • 1 tablespoon vanilla
  • 1/4 milk/buttermilk
  • salt

Preheat oven at 350F and line a muffin pan with cupcake liners. Cream the butter with the sugar at medium speed until pale yellow. Add the eggs one at a time waiting until they are fully incorporated to the mix. Add vanilla. Sift together the flour, baking powder, and salt in a separate bowl, and add slowly to the eggs/butter mixture. Add the milk and beat until combined (do not over mix!). Pour into the cupcake liners and bake for 17-20 minutes.

tip: do not open the oven on the first 17 minutes to allow the cupcakes to rise nicely. After that you can begin to check with a toothpick until it comes out dry.

Raspberry Ice Cream Cheese Frosting (yields about two cups, you might want to double it)

  • 1 (8oz) package cream cheese at room temp
  • 1/4 butter
  • 1 – 2 cups confectioners’ sugar
  • 1 packet Crystal Light Raspberry Ice disolved in 1/4 water
  • Rainbow Nerds for garnish

Beat the cream cheese and the butter together until light and creamy. Slowly add the confectioners’ sugar until desired flavor and consistency achieved. Slowly add the Raspberry Ice water, and beat until incorporated. Let cupcakes cool down, frost, and sprinkle generously with Nerds.

Enjoy!

Diana.

I’m Feeling… Spicy!!

26 Apr

A couple of weeks ago my mother, who was in town visiting, and myself had an invitation to have lunch at a friend’s house. The weather in Bogota is kind of cold this time of the year and although I don’t mind putting on a jacket and going out… I do hate the rain, and April is known for it’s nonstopping rain in this city particularly. So it didn’t come as a surprise that they’ve made soup for us (wich I wasn’t the biggest fan of until that day!). They welcomed us with this unbelievable good Tortilla soup, also known as Mexican soup. It tasted like no soup I ever tried before and while I was eating it, all I could think about was that I needed that recipe so that I could post it as soon as possible! And so here it is, the greatest tortilla soup I’ve ever tried and so easy to make you won’t believe that it can taste this good!

 Not only does it have these chunks of crunchy tortilla chips, avocado, cheese, chicken and sweet corn mixed in the bottom of the plate, but the soup has this light yet tasty spicy flavor that just makes you want to smile for the rest of the day!

Image

Make sure to incorporate the tortillas right before eating the soup, that way you will enjoy the crunchy texture. If you leave the tortillas in the soup for a while they will loose the texture and will become very soft. The great taste will be the same though!

Image

PIA’S MEXICAN SOUP (TORTILLA SOUP)

  • 6 Tomatoes
  • 1 Onion
  • 2 Garlics
  • 1 Chicken Breast
  • 4 Corianders
  • 2 Leeks
  • 1 Carrot
  • 2 Celery
  • 1 Chicken Bouillon cube
  • Fried Tortillas or Tortilla Chips
  • 1 diced Avocado
  • 1 can of Sweet Corn
  • diced hard White Cheese (I used about 1/3 cup per plate)
  • Chile Chipotle sauce
  • Water
  • Olive Oil
  • Salt

Peel the tomatoes. To do so boil water and put the tomatoes inside for about 1 minute. Take the tomatoes out and put them in cold water. The skin will peel right of. In the blender mix the tomatoes, half of the onion and one garlic until they become a thick sauce. Put them in a frying pan with a bit of olive oil and cook for 10 minutes. Let it rest.

For the soup: in a bowl put the chicken breast, half an onion, one carrot cut in half, the coriander, the celery (the white part), the leeks (the white part) and a chicken bouillon cube. Fill up the bowl with ¾ of water. Let it boil and then lower the fire. Cook for 45 minutes.

Drain the soup. Take out the chicken breast and shred it. Incorporate the cooked tomato mix into the drained soup and sprinkle some salt if needed. Add a few drops of chile chipotle sauce. If you want to make the soup a little thicker, blend the coriander with a bit of tortilla chips and half a cup of the soup. Incorporate the mix to the soup and stir.

Put the diced avocado, corn, diced cheese, shredded chicken and tortilla chips in a soup plate and pour the soup on top of it. Better if it’s hot enough for the cheese to melt a little… And dig in!

Hope you like it!!

Maria Victoria

Image

I’m Feeling… Mixed!!

23 Apr

So yesterday was the typical Sunday night for me.. Went to the supermarket with my friend whom I sometimes cook for to practice some of my recipes. Since always I’ve enjoyed hanging out with my friends and catching up on things. It has become like a tradition to cook pasta and drink wine while we talk about pretty much anything, at least once a week. We got to talk about life, friends, love, future and just remembering the past and the good times. It felt bittersweet to remember things, probably because some of my greatest memories are from my hometown and I don’t live there at the moment so I had mixed emotions about it. I wanted to reflect my mood in the food somehow, so as I was getting ready to cook I decided to mix random ingredients instead of preparing the regular tomato sauce. I chose prosciutto, oven dried cherry tomatoes, black truffle oil and basil, but for the cheese I had something else in mind. When we went grocery shopping we past by this delicious selection of different cheeses, I was going to get parmesan for the pasta but instead I bought Manchego. I wanted to make it a bit softer so I macerated it in a bit of white wine.. Let’s face it, that goes well with pretty much anything!! And yes, the flavor was unbelievable!!

Image

The only thing I cannot take complete credit for in this recipe is for the oven dried tomatoes! My sister taught me how to make this deliciousness a long time ago. They go great with everything! Even by themselves as a snack! If you leave them long enough in the oven you’ll get the perfect dry and crunchy texture. Just make sure to take all of the seeds out before baking them, otherwise it won’t work properly!

Image

When I was finished with my dish it was the perfect combination of flavors I was looking for and it worked perfectly I must say! The pasta was delicious and I felt much better after eating it!

PROSCIUTTO, DRIED TOMATOES & MANCHEGO CHEESE PASTA – WITH FRESH BASIL AND BLACK TRUFFLE OIL

  • Pasta of your preference
  • 5-6 slices of Prosciutto
  • 1/2 cup of  diced Manchego Cheese
  • 1 cup of  White Wine
  • 2 cups of Cherry Tomatoes
  • Black Truffle Oil
  • Fresh Basil
  • Black Pepper

For the tomatoes, preheat the oven to 275 °F. Cut the cherry tomatoes in half, extract the seeds (as explained in the picture above), that way you will get dry and crunchy tomatoes with no liquids. Season the tomatoes with a bit of olive oil, salt, sugar and black pepper and put them in the oven. Keep and eye on them, they will be ready in about 20-30 minutes.

Dice the manchego cheese. In a bowl pour the white wine and put the pieces of cheese on it. Let it rest there for 30 minutes.

Cut the prosciutto in small pieces.  Take the fresh basil and cut it in strips.

Mix the pasta, dried tomatoes, diced cheese and pieces of prosciutto. On top put the basil and drizzle a little black truffle oil. Sprinkle some black pepper… And dig in!

Hope you like it!!

Maria Victoria

Image

I’m Feeling… Like a Tourist!!

18 Apr

I love Boston this time of the year. Since last Friday the weather has magically shifted from a cold and windy nightmare, to incredibly nice -not too hot, not cold at all- But I love it even more for another reason, which people often hate in their cities… the tourists!! Whenever Boston is filled with tourists I feel like I’m visiting the city for the first time all over again. There is something about the overly crowded sidewalks that makes the city look so different, so different indeed that I got lost for a couple of minutes trying to get to my apartment on a street that I walk by everyday. And this long weekend Boston was overflowing with tourists; not only was the opening game of the Red Sox on Friday -or whatever that was- but people from everywhere came to the Boston Marathon on Monday.

Seeing the city like that makes me very happy, especially since the winter has just ended and people on the winter tend to be rude and angry all the time in my opinion. So on Monday my boyfriend and I decided to walk around and watch the marathon; it was such a happy sight seeing everybody cheerful as they finished the marathon and all of the families yelling and holding up posters, and the weather was incredible. Maybe a bit too hot for the runners but to me it was awesome. We had dessert before lunch, and I got to enjoy my favorite Cold Stone ice cream outdoors for the first time this year.

I was craving something spring-y and refreshing -and a pizza- all day long so I decided to make a couple of individual pizzas when we got home that sounded and tasted like spring to me. I actually don’t know when different fruits are in season, but I associate juicy and sweet fruits with spring and summer. When I got to the supermarket I went on a fruit shopping spree, this might sound like a joke to anyone who knows me. It is no joke though. I bought fruits, and maybe I’m going to pour chocolate all over them, but I’m still going to eat lots of fruit. The proof of that is the pear, proscuitto, gorgonzola, and arugula pizzas that I made. They were light, sweet, tangy, and delicious, and it was the perfect flavor combination I was craving. It tasted like spring and cheese -which actually goes well with any weather-

PEAR, PROSCIUTTO, GORGONZOLA & ARUGULA PIZZA

  • 1 pizza dough (divided to make two individual pizzas or complete to make a whole pizza) or 1 pizza crust
  • 1 cup Provolone cheese
  • 1/2 cup crumbled Gorgonzola cheese
  • 1 ripe pear thinly sliced (I used a mandoline)
  • 4-5 slices of prosciutto cut into thirds
  • 1 cup baby arugula
  • sea salt
  • olive oil (optional)

Preheat the oven to 45o°F. Flatten and shape your pizza dough (if using) and sprinkle with the Provolone cheese. Cover with the pear slices evenly and sprinkle the crumbled Gorgonzola cheese on top. Add the prosciutto and bake for 10-15 minutes. Remove the pizza from the oven and let it cool slightly, while it is still warm toss the baby arugula, sprinkle a little salt, and drizzle with some olive oil.

Enjoy!

Diana.

I’m Feeling… Fresh!!

16 Apr

Among the many changes I’ve experienced through the years, I have to say that moving by myself has been one of the most challenging yet fascinating of all. From organizing to the most boring thing ever (cleaning), everything has to be taken care of if you want to live in a somewhat relaxed environment.

Cooking however, has become one of those activities I really enjoy doing when I have some spare time. I love cooking dishes that are spontaneous and easy to prepare but always keeping the good flavors and combinations at it’s best.

On that note I decided to prepare something simple yet delicious for today’s post. I love the taste of sweet and sour foods and I love Salmon even more,  so I came up with this “Sweet and Sour Salmon & Avocado Sandwich”. Not too much ingredients or complicated preparations though, just wanted to keep it fresh.

Image

The key flavor in this sandwich and what makes it different is the layer of homemade caramelized peppers on one of the sides of the bread. Because of it’s texture and particularly sweet and sour taste, it combines perfectly with the salmon and the avocado. You can enjoy different sensations without feeling too overwhelmed by any of the ingredients.

Image

SWEET N’ SOUR SALMON & AVOCADO SANDWICH 

  • 5-6 slices of Smoked Salmon (it depends on how many layers you want..)
  • One tablespoon of Philadelphia cream cheese
  • ½ soft Avocado
  • One tablespoon of Baby Capers
  • ½ Red Pepper
  • ½ cup of Sugar
  • 1/3 cup of Water
  • 1/3  cup of White Vinegar
  • Olive Oil
  • Black Pepper
  • Salt
  • One Baguette (or the bread of your preference)

Dice the red pepper. In a saucepan mix the red peppers, the water, the white vinegar and the sugar and cook it on low fire. Do not stir. Let it boil until becomes caramel and remove from fire. Let it cool.

In a bowl mix the avocado with a little bit of olive oil, salt and black pepper. Mash with a fork until it’s creamy.

Cut the smoked salmon into thin slices. Spread olive oil and black pepper and let it rest. Take a portion of the baguette and heat it in the grill. If you want you can spread a bit of olive oil on top to make it more crunchy. Remove from grill. In one side of the bread spread the philadelphia cheese. Then put the slices of smoked salmon and on top of them put the avocado and the capers. In the other side of the bread spread the caramelized red peppers… And dig in!

Hope you like it!!

Maria Victoria

Image

I’m Feeling… Excited!!

11 Apr

After over a year of gazing food blogs and daydreaming about ever creating my own here is my first post! I thought of a thousand things to cook for this first post, and even cooked a few, but none of them seemed worthy of a first post. But then, a few days ago I was walking with my boyfriend through the mall and we found this tiny gourmet shop. I spent nearly an hour trying to decide which chocolate bar I wanted to buy, all of the combinations were so appealing! However I realized that before entering the world of weird chocolate combinations I NEEDED to try the bacon and chocolate one. So I bought the Voges dark bacon + chocolate bar.

It was incredibly different to anything I have tried before, and I absolutely loved it, but I needed more bacon. As soon as I got home I decided that I needed to do something to fuze this two flavors together to perfection. Then I remembered that to me, perfection is saltine cracker toffee. I replaced the saltine crackers, which are of course, salty, with the perfect and salty bacon, and I created bacon toffee. The toffee gave my new experience with bacon and chocolate a whole new dimension.

It was sweet because of the chocolate, then I left the caramel on the toffee burn a little so it added subtle bitter notes, and then it was salty because of the bacon. I am a big fan of sweet and salty sweets, so I added a little fleur de sel, however, it can be left out if the saltiness of the bacon feels like enough. On a different note, making my first post has been very hard. Not writing the post itself, but gathering the courage to cook, write about it, and posting the pictures -which is probably the hardest part!!- I took 87, yes eighty seven, pictures of the bacon toffee from which I only liked very very few. Hopefully all of this will get easier with time!


Anyways, thank you for reading my first post if anybody out there is reading this, and I hope you make and enjoy bacon toffee!

BACON TOFFEE – I halved the entire recipe because I didn’t have a lot of bacon, but it can be easily doubled.

  • 6 strips of bacon
  • 1/2 cup of butter (1 stick)
  • 1/4 cup of white sugar
  • 1  teaspoon of water
  • 1/2 teaspoon of vanilla
  • 1 cup of semisweet chocolate chips
  • a pinch of fleur de sel (optional)
Cook the bacon any way you like it (I like to cook mine in the oven) and cut it into thirds.
Preheat the oven to 350°F. Line a baking sheet with aluminum foil, or parchment paper and set aside.
In a medium saucepan melt the butter with the sugar, and add the water. Stir until it begins to boil. Once its boiling stop stirring for about 3 minutes, you can move the saucepan from side to side if you feel it may burn. After about 3 minutes it will being changing colors; here is the part where I always panic, it is almost a matter of seconds from the time you have a yellow-y caramel, to the time you have a black, burnt, mess. Keep moving the saucepan and gently stir from time to time until you get a medium to deep brown caramel, depending on how you like it (I like mine a little on the burnt side to have the contrast of flavors).
Remove from fire and add the vanilla. Quickly, as the caramel will begin to harden, cover the bacon strips with the caramel (I decided to just spread the caramel on the bacon strips because I think toffee is meant to be a little messy!) and bake it for about 10 minutes; I do this to allow the caramel and the bacon to really stick together. Remove from the over and cover with the chocolate chips, I used an offset spatula to spread the chocolate, but a knife will work just fine. Sprinkle a little bit of fleur de sel or sea salt if you like and let it cool, and eat it.
Enjoy!
Diana.